

GROSIR KAOS POLOS & KAOS MURAH
Wednesday, 24 August 2011
0
comments
Adsense Content. recommended 336 X 300
This article will lead you how to make a program to access input output data in parallel port, simple example, this program is used to turn on and turn of LED which is set in Parallel Port, Data Register in computer (Pin D2 until pin D9) in Parallel Port/ LPT.
The steps are as follows:
Enter the following component in Form 1:
| No | Component | Property | Value |
| 1 | Shape1 | Name | ShpLED1 |
| Shape | stCircle | ||
| Height | 41 | ||
| Width | 41 | ||
| Brush Color | clWhite | ||
| Brush Style | bsSolid | ||
| 2 | Shape2 | Name | ShpLED2 |
| Shape | stCircle | ||
| Height | 41 | ||
| Width | 41 | ||
| Brush Color | clWhite | ||
| Brush Style | bsSolid | ||
| 3 | Shape3 | Name | ShpLED3 |
| Shape | stCircle | ||
| Height | 41 | ||
| Width | 41 | ||
| Brush Color | clWhite | ||
| Brush Style | bsSolid | ||
| 4 | Shape4 | Name | ShpLED4 |
| Shape | stCircle | ||
| Height | 41 | ||
| Width | 41 | ||
| Brush Color | clWhite | ||
| Brush Style | bsSolid | ||
| 5 | Shape5 | Name | ShpLED5 |
| Shape | stCircle | ||
| Height | 41 | ||
| Width | 41 | ||
| Brush Color | clWhite | ||
| Brush Style | bsSolid | ||
| 6 | Shape6 | Name | ShpLED6 |
| Shape | stCircle | ||
| Height | 41 | ||
| Width | 41 | ||
| Brush Color | clWhite | ||
| Brush Style | bsSolid | ||
| 7 | Shape7 | Name | ShpLED7 |
| Shape | stCircle | ||
| Height | 41 | ||
| Width | 41 | ||
| Brush Color | clWhite | ||
| Brush Style | bsSolid | ||
| 8 | Shape8 | Name | ShpLED8 |
| Shape | stCircle | ||
| Height | 41 | ||
| Width | 41 | ||
| Brush Color | clWhite | ||
| Brush Style | bsSolid | ||
| 9 | EditText1 | Name | EdLED1 |
| Text | - | ||
| 10 | EditText2 | Name | EdLED2 |
| Text | - | ||
| 11 | EditText3 | Name | EdLED3 |
| Text | - | ||
| 12 | EditText4 | Name | EdLED4 |
| Text | - | ||
| 13 | EditText5 | Name | EdLED5 |
| Text | - | ||
| 14 | EditText6 | Name | EdLED6 |
| Text | - | ||
| 15 | EditText7 | Name | EdLED7 |
| Text | - | ||
| 16 | EditText8 | Name | EdLED8 |
| Text | - | ||
| 17 | Button1 | Name | BtnNyalaLED1 |
| Caption | NyalakanLED1 | ||
| 18 | Button2 | Name | BtnNyalaLED2 |
| Caption | NyalakanLED2 | ||
| 19 | Button3 | Name | BtnNyalaLED3 |
| Caption | NyalakanLED3 | ||
| 20 | Button4 | Name | BtnNyalaLED4 |
| Caption | NyalakanLED4 | ||
| 21 | Button5 | Name | BtnNyalaLED5 |
| Caption | NyalakanLED5 | ||
| 22 | Button6 | Name | BtnNyalaLED6 |
| Caption | NyalakanLED6 | ||
| 23 | Button7 | Name | BtnNyalaLED7 |
| Caption | NyalakanLED7 | ||
| 24 | Button8 | Name | BtnNyalaLED8 |
| Caption | NyalakanLED8 | ||
| 25 | Button9 | Name | BtnMatiLED1 |
| Caption | MatikanLED1 | ||
| 26 | Button10 | Name | BtnMatiLED2 |
| Caption | MatikanLED2 | ||
| 27 | Button11 | Name | BtnMatiLED3 |
| Caption | MatikanLED3 | ||
| 28 | Button12 | Name | BtnMatiLED4 |
| Caption | MatikanLED4 | ||
| 29 | Button13 | Name | BtnMatiLED5 |
| Caption | MatikanLED5 | ||
| 30 | Button14 | Name | BtnMatiLED6 |
| Caption | MatikanLED6 | ||
| 31 | Button15 | Name | BtnMatiLED7 |
| Caption | MatikanLED7 | ||
| 32 | Button16 | Name | BtnMatiLED8 |
| Caption | MatikanLED8 | ||
| 33 | Button17 | Name | BtnOpenPort |
| Caption | Open Port | ||
| 34 | Button18 | Name | BtnClosePort |
| Caption | CloseProgram | ||
| 35 | SmallPort1 | Name | SmPort1 |
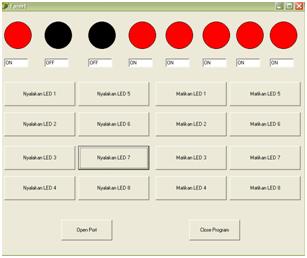
In the monitor will appear image like the following;

Picture1. Accessing PC Parallel Port (LPT Port) With Borland Delphi 7.0 Using Small Port Component : Visualization of the Program which will be made.
Before making listing program (source code) first we decide 2 variables which will be used; those are “data” and “NewData” which mean:
| NO. | NAMA KOMPONEN | SOURCE CODE |
| 1 | BtnMatiLED1 | data := SmPort1.ReadByte($378); baru := data AND 254; SmPort1.WriteByte($378,baru); ShpLED1.Brush.Color := clBlack; EdLED1.Text:='OFF'; |
| 2 | BtnMatiLED2 | data := SmPort1.ReadByte($378); baru := data AND 253; SmPort1.WriteByte($378,baru); ShpLED2.Brush.Color := clBlack; EdLED2.Text:='OFF'; |
| 3 | BtnMatiLED3 | data := SmPort1.ReadByte($378); baru := data AND 251; smport1.WriteByte($378,baru); ShpLED3.Brush.Color := clBlack; EdLED3.Text:='OFF'; |
| 4 | BtnMatiLED4 | data := SmPort1.ReadByte($378); baru := data AND 247 ; SmPort1.WriteByte($378,baru); ShpLED4.Brush.Color := clBlack; EdLED4.Text:='OFF'; |
| 5 | BtnMatiLED5 | data := SmPort1.ReadByte($378); baru := data AND 239; SmPort1.WriteByte($378,baru); ShpLED5.Brush.Color := clBlack; EdLED5.Text:='OFF'; |
| 6 | BtnMatiLED6 | data := SmPort1.ReadByte($378); baru := data AND 223 ; SmPort1.WriteByte($378,baru); ShpLED6.Brush.Color := clBlack; EdLED6.Text:='OFF'; |
| 7 | BtnMatiLED7 | data := SmPort1.ReadByte($378); baru := data AND 191; SmPort1.WriteByte($378,baru); ShpLED7.Brush.Color := clBlack; EdLED7.Text:='OFF'; |
| 8 | BtnMatiLED8 | data :=SmPort1.ReadByte($378); baru := data AND 127; SmPort1.WriteByte($378,baru); ShpLED8.Brush.Color := clBlack; EdLED8.Text:='OFF'; |
| 9 | BtnNyalaLED1 | data := SmPort1.ReadByte($378); baru := data or 1; SmPort1.WriteByte($378,baru); ShpLED1.Brush.Color := clRED; edLED1.Text:='ON'; |
| 10 | BtnNyalaLED2 | data := SmPort1.ReadByte($378); baru := data or 2; SmPort1.WriteByte($378,baru); ShpLED2.Brush.Color := clRED; edLED2.Text:='ON'; |
| 11 | BtnNyalaLED3 | data := SmPort1.ReadByte($378); baru := data or 4; SmPort1.WriteByte($378,baru); ShpLED3.Brush.Color := clRED; edLED3.Text:='ON'; |
| 12 | BtnNyalaLED4 | data := SmPort1.ReadByte($378); baru := data or 8; SmPort1.WriteByte($378,baru); ShpLED4.Brush.Color := clRED; edLED4.Text:='ON'; |
| 13 | BtnNyalaLED5 | data := SmPort1.ReadByte($378); baru := data or 16; SmPort1.WriteByte($378,baru); ShpLED5.Brush.Color := clRED; edLED5.Text:='ON' |
| 14 | BtnNyalaLED6 | data := SmPort1.ReadByte($378); baru := data or 32; SmPort1.WriteByte($378,baru); ShpLED6.Brush.Color := clRED; edLED6.Text:='ON'; |
| 15 | BtnNyalaLED7 | data := SmPort1.ReadByte($378); baru := data or 64; SmPort1.WriteByte($378,baru); ShpLED7.Brush.Color := clRED; edLED7.Text:='ON'; |
| 16 | BtnNyalaLED8 | data := SmPort1.ReadByte($378); baru := data or 128; SmPort1.WriteByte($378,baru); ShpLED8.Brush.Color := clRED; edLED8.Text:='ON'; |
| 17 | BtnOpenPort | SmPort1.Opened:=true; |
| 18 | BtnCloseProgram | Close; |
“New data” is value that will be written to the parallel port after conducted
“Modification” with logical “and” or “or” to conduct bit setting or bit clearing data which is written in the form of 8 bit data (1 byte)
Variable writing decision is conducted under the writing:
var
Form 1:Tform1;
The result is as follows:


Picture 2. Accessing PC Parallel Port (LPT Port) With Borland Delphi 7.0 Using Small Port Component : variable declaration
The next step is how to make source code program comprehensively so that the program can be used:
Type source code below, appropriate with each component which mean:result of program execution is like this:
Picture 3. Accessing PC Parallel Port (LPT Port) With Borland Delphi 7.0 Using Small Port Component : The Result of Program Execution.
I hope this writing can give benefit to the visitors, readers, developer and me. Thanks for visiting and availability for sharing this article by pressing Share To Facebook, Twitter button or just press like button.


0 komentar:
Show Hide CommentsPosting Komentar